Difference between revisions of "Terrain Generation"
(→Terrain Generation from Images) |
|||
| (One intermediate revision by one user not shown) | |||
| Line 1: | Line 1: | ||
| + | {{engine}} | ||
| + | |||
==Terrain Generation from Images== | ==Terrain Generation from Images== | ||
| Line 43: | Line 45: | ||
"terrain": | "terrain": | ||
{ | { | ||
| − | "image" :"./512 | + | "preset" :"overWorld", |
| + | "image" :"./512", | ||
"mapping": | "mapping": | ||
{ | { | ||
| Line 57: | Line 60: | ||
"0012FF": 9, | "0012FF": 9, | ||
"99BBCD":10 | "99BBCD":10 | ||
| + | }, | ||
| + | "elevationMapping": | ||
| + | { | ||
| + | "000000": 0, | ||
| + | "404040": 1, | ||
| + | "808080": 2, | ||
| + | "A0A0A0": 3, | ||
| + | "F0F0F0": 4, | ||
| + | "400000": 5, | ||
| + | "800000": 6, | ||
| + | "A00000": 7, | ||
| + | "C00000": 8 | ||
} | } | ||
} | } | ||
| Line 84: | Line 99: | ||
That is all there is to it! | That is all there is to it! | ||
| + | |||
| + | [[Category:Modding|Terrain Generation]] | ||
Latest revision as of 16:54, 15 February 2015
|
Terrain Generation from Images
Lugdunon provides a simple method of generating terrain data from an image file. All you need is the latest lugdunon-server.jar, a suitable image, and a config file. A few things about the terrain data need to be understood beforehand.
- Worlds are sized as a power of two. This means that both the width and height of your terrain image needs to be a power of two. 512, 1024, and 2048 are popular sizes for getting started experimenting.
- The terrains in Lugdunon are constructed of layers of terrain types. These are defined in the tileset definition. The default tileset definition defines them like so:
- ...
- layers:
- [
- {name:"Bedrock", x: 0,y:10,cost:1, elevation:{x: 0,y:24} },
- {name:"Granite", x: 3,y:10,cost:1, elevation:{x: 5,y:24} },
- {name:"Sandstone",x: 6,y:10,cost:5, elevation:{x:10,y:24} },
- {name:"Sand", x: 9,y:10,cost:5, elevation:{x:15,y:24} },
- {name:"Dirt", x:12,y:10,cost:5, elevation:{x:20,y:24} },
- {name:"Grass", x:15,y:10,cost:5, elevation:{x:25,y:24} },
- {name:"Tilled", x:18,y:10,cost:10, overlays :5 },
- {name:"Snow", x:21,y:10,cost:10,elevation:{x:30,y:24},melts :true},
- {name:"Lava", x: 0,y:17,cost:5, impassable:true},
- {name:"Water", x: 3,y:17,cost:5, impassable:true},
- {name:"Ice", x: 6,y:17,cost:15 }
- ],
- ...
- Each terrain layer has an index. That index is the order in which it is defined in the above layers array and it determines which layers physically cover others.
- Terrain data encapsulates both the terrain layer and the terrain elevation information. At this time, only the terrain layer information is generated by this tool. In the future, support will be added for generating elevation data as well.
For the purposes of this example, we are going to be using the following image:
If you look closely you can see that there are some roads laid out using the granite layer, paths laid out using the dirt layer, and a few farm plots among the snow, grass, sand, water, lava, and bedrock.
We will also be using the following configuration file:
- {
- "tileset":"net.lugdunon.world.defaults.Tileset",
- "seed" :0,
- "terrain":
- {
- "preset" :"overWorld",
- "image" :"./512",
- "mapping":
- {
- "000000": 0,
- "9B9B9B": 1,
- "BA871E": 2,
- "EDEB3F": 3,
- "644702": 4,
- "1B8720": 5,
- "896716": 6,
- "BFE1F2": 7,
- "FF0000": 8,
- "0012FF": 9,
- "99BBCD":10
- },
- "elevationMapping":
- {
- "000000": 0,
- "404040": 1,
- "808080": 2,
- "A0A0A0": 3,
- "F0F0F0": 4,
- "400000": 5,
- "800000": 6,
- "A00000": 7,
- "C00000": 8
- }
- }
- }
The two most important things in the configuration file are the terrain.image and terrain.mapping entries. Usually tileset and seed should not need changing unless you are looking at more advanced customization, which will soon be discussed in the Custom Config section. terrain.image is the image to be used as input and the terrain.mapping object is used to map the colors in the image to their corresponding layers.
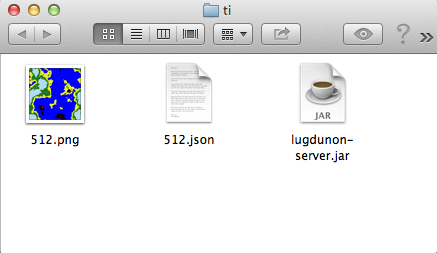
Copy the above configuration entry into a plain text file named 512.json and place it into the same directory as the lugdunon-server.jar and 512.png.
Putting all this together, you should have a folder somewhere on your system that looks something like this:
Now, from the command line, type:
java -cp lugdunon-server.jar net.lugdunon.world.terrain.Terrain 512.json 512.dat
The configuration file is supplied as the first argument and the resulting terrain.dat file is supplied as the second argument.
If everything went smoothly, you should have a 512.dat file in your directory. To use your newly generated terrain, first stop your server, place the 512.dat file (renamed to terrain.dat) in your server’s current world/etc/instances/0 directory, and restart your server.
That is all there is to it!

